This document describes how to set up Voice on a new AWS EC2 server.
Prerequisites
You will need an Amazon Web Services account, which will require a credit card for any expenses that you incur. Be very aware of what you do with AWS. It is the candy store of temptation. Your credit card will be charged. At best, you can restrict your usage to free services, which often have time limitations. Monitor your usage constantly and set up appropriate notifications so that you can curtail or adjust use before incurring unwanted charges.
Choose AWS regional data center
These instructions were tested in the N. California data center and these instructions may not apply to other regions. Choose your AWS region appropriately:

Create an EC2 T2 Server
T2 servers are the bread-and-butter starter servers. Modest in size, they are still quite capable and are normally cost-effective or even free.
Launch instance

Choose instance type
You'll see a long list of servers. To shorten the list, select Free tier only and type ubuntu into the search box. You want a Free-Tier Ubuntu 20.4 server:

Confirm selection and click the Next: Configure Instance Details button (!!!)

Configure Instance
Leave the settings on the "Configure Instance Details" page as they are.
NOTE: If you have a pre-defined Voice-Server IAM Role, you can choose it here.
Add Storage
Replace the 8 with 30:

Click Next: Add Tags
Add Name Tag
Click Add Tag to add a sensible name for your new server:

Configure Security Groups
Note: To save time in the long run, it may be best to set up a security group (under Network & Security in the AWS admin panel) with the following permissions and assign it to any new relevant instances created rather than assign them individually.
This is an important step that specifies what network access is allowed. We want to enable IPV4 and IPV6 TCP access for:
- port 80 (standard HTTP port)
- port 443 (standart HTTPS port)
- port 22 (standard SSH port)

- Add SSH Port to security group The SSH port provides super user access to your instance. As best practice, this port should only be accessible from known IP addresses. From a practical point of view, the source IP restriction may be hard to come by. You can accept the default and restrict Source IP later to your computers.
Click Add Rule (if needed):

- Add HTTP Port to security group The HTTP port provides standard HTTP browser access. Voice can be launched using HTTP or HTTPS
Click Add Rule:

- Add HTTPS Port to security group The HTTPS port provides standard HTTP browser access. Voice can be launched using HTTP or HTTPS
Click Add Rule:

If you need to add other rules, do so now.
Click Review and Launch.
Create SSH key pair
If you already have AWS credentials, use them for your new server. Otherwise, create and download SSH credentials (.pem) for logging in to your new T2 instance via SSH.

Download and save the .pem file in your ~/.aws folder as sabbamitta-ssh2.pem.
Also change the file permissions to 400, which is only readable by user:
chmod 400 ~/.aws/sabbamitta-ssh2.pem
Launch Instance
Now you can finally launch your server. Pay attention to everything on the Launch Status page. It matters!
Your 12 month free usage clock starts now. Be sure to shut down your instance when not in use!

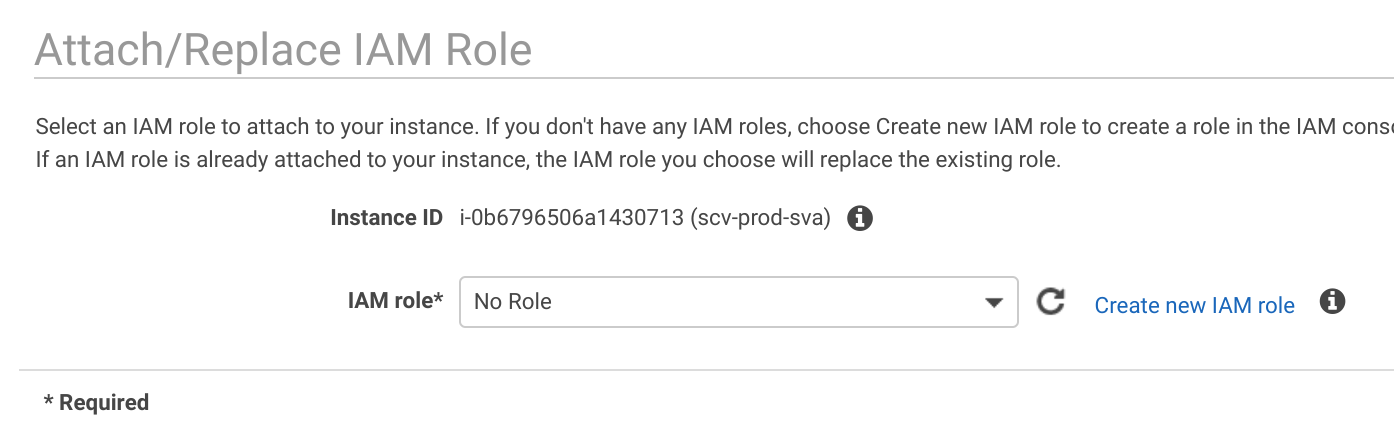
Attach/Create IAM Role
We need to create an IAM Role that defines what our new server can do. For security, AWS EC2 servers are prohibited from doing anything with other servers or services. Although we can set up each individual server to with its appropriate permissions, it is better to set up a Identity and Access Management (IAM) role that can be assigned to our new server. In the following we will create the Voice-Server IAM role using the EC2 Console.
Using the EC2 Console, select your new server and click
Actions|Security|Modify IAM Role

Look for the Voice-Server IAM role in the dropdown
- If
Voice-Serveris not shown, click Create new IAM role - If
Voice-Serveris shown, select it and click Apply and skip the instructions on creating an IAM role.
Creating an IAM Role
Click Create role

Select EC2 use case then click Next: Permissions

Type polly into the search box and select AmazonPollyFullAccess permissions

Type EC2 into the search box and select AmazonEC2ReadOnlyAccess permissions

Click Next: Tags
Enter a tag that can help you remember the purpose of this role and click
Next:Review :

Enter Voice-Server as the Role name and click Create role

Once the role is created, select the IAM role and click Apply
Install Voice Server
Connect to your instance using your previously downloaded ssh certificate:
ssh -i ~/.aws/sabbamitta-ssh2.pem ubuntu@MY_NEW_AWS_SERVER_IP
This should open up an ssh connection to your new AWS server.
Install Voice on Server
Connect to AWS server using ssh and install Voice.
sudo chown -R $(whoami):$(whoami) ~
git clone https://github.com/sc-voice/sc-voice.git
cd sc-voice
sudo chown -R $(whoami):$(whoami) .
./scripts/init.sh
sudo chown -R $(whoami):$(whoami) .
Update Voice but do not reboot:
./scripts/update-latest
Launch Voice in HTTP mode for port 80
sudo npm start
Verify that Voice is running by using a browser to view the public IP of the AWS server. Don't press any buttons (e.g., audio won't work) The HTTP port 80 Voice server is temporary. We are just using it to verify that Voice can run on the AWS server.
After verifying that Voice functions as expected on HTTP port 80, we will need to shut down the HTTP port 80 server
CTRL-C
sudo chown -R $(whoami):$(whoami) * .*
We'll now return to your own machine to upload ssl certifate...
exit
Install SSL Certificate
Open up SuttaCentral Discuss&Discover to get the SSL Certificate:
- Click the Search icon
- Select the
search messagescheckbox - Enter
Voice Adminand press Enter
scp -i ~/.aws/sabbamitta-ssh2.pem voice-ssl.tar.gz ubuntu@MY_NEW_AWS_SERVER_IP:sc-voice/local
Connect to your AWS server to install the SSL certificate
ssh -i ~/.aws/sabbamitta-ssh2.pem ubuntu@MY_NEW_AWS_SERVER_IP
cd sc-voice/local
gunzip voice-ssl.tar.gz
tar -xvf voice-ssl.tar
Now install daemon and reboot.
cd ../
./scripts/sc-voice-daemon.sh
sudo shutdown -r now
Add AWS credentials
Voice uses AWS services which require authentication. Once the Voice server has rebooted, you will need to add AWS credentials by logging in as admin.
- Click on the VSM tab
- Click Edit Credentials
- Enter your Access Key Identifier
- Enter your Secret Access Key
- Click Save
Public Static IP
Every time an AWS EC2 server is restarted, it will be given a new public IP.
Generally speaking, it is important to have a public static IP available at all times.
DNS mapping requires that SuttaCentral be able to map a
fully qualified name such as staging.voice.suttacentral.net to a specific static IP.
Every AWS account is allowed one free Elastic IP (i.e., static public IP) that is mapped to an AWS EC2 running instance. Note that "running" is critical here. You will be charged for having a static IP that is not in use.

To practice Elastic IP setup, do the following:
- Allocate New Address (under Network & Security > Elastic IPs)
- Associate that address with your running EC2 instance
- Verify that Voice is available on the new static IP
- Delete your Elastic IP ("Release address") when you shut down your running EC2 instance unless it is referenced by SuttaCentral itself.